Introduction
This guide helps you set up a privacy-focused, DNS-over-HTTPS (DoH) solution for your entire LAN – without requiring per-device configuration (which isn’t even possible on e.g., iOS). Instead, we centralize DoH at the network level using a Linux server. For this guide, I’ll be using Fedora Server, but the steps can be adapted to any distribution. The setup is extremely lightweight and runs well on minimal hardware – even an old Raspberry Pi, thin client, or any old computer. In my setup, Cloudflared uses just 22 MB of RAM and Pi-hole around 8 MB, making this an efficient and low-footprint solution for any home network.
We use Podman to run two containers:
- Cloudflared, which forwards DNS queries securely over DoH to Cloudflare’s DNS servers.
- Pi-hole, which acts as a local DNS resolver and filtering layer.
This combination provides a clean and modular approach to implementing secure DNS with Cloudflared and Pi-hole, fully isolated in containers.
To serve Pi-hole’s web interface over HTTPS, we deploy an NGINX reverse proxy in front of it. Pi-hole’s built-in lighttpd server currently lacks proper TLS 1.3 support and fails with modern self-signed certificates. By decoupling TLS handling from Pi-hole, we gain full control over protocol support without relying on the built in lighttpd.
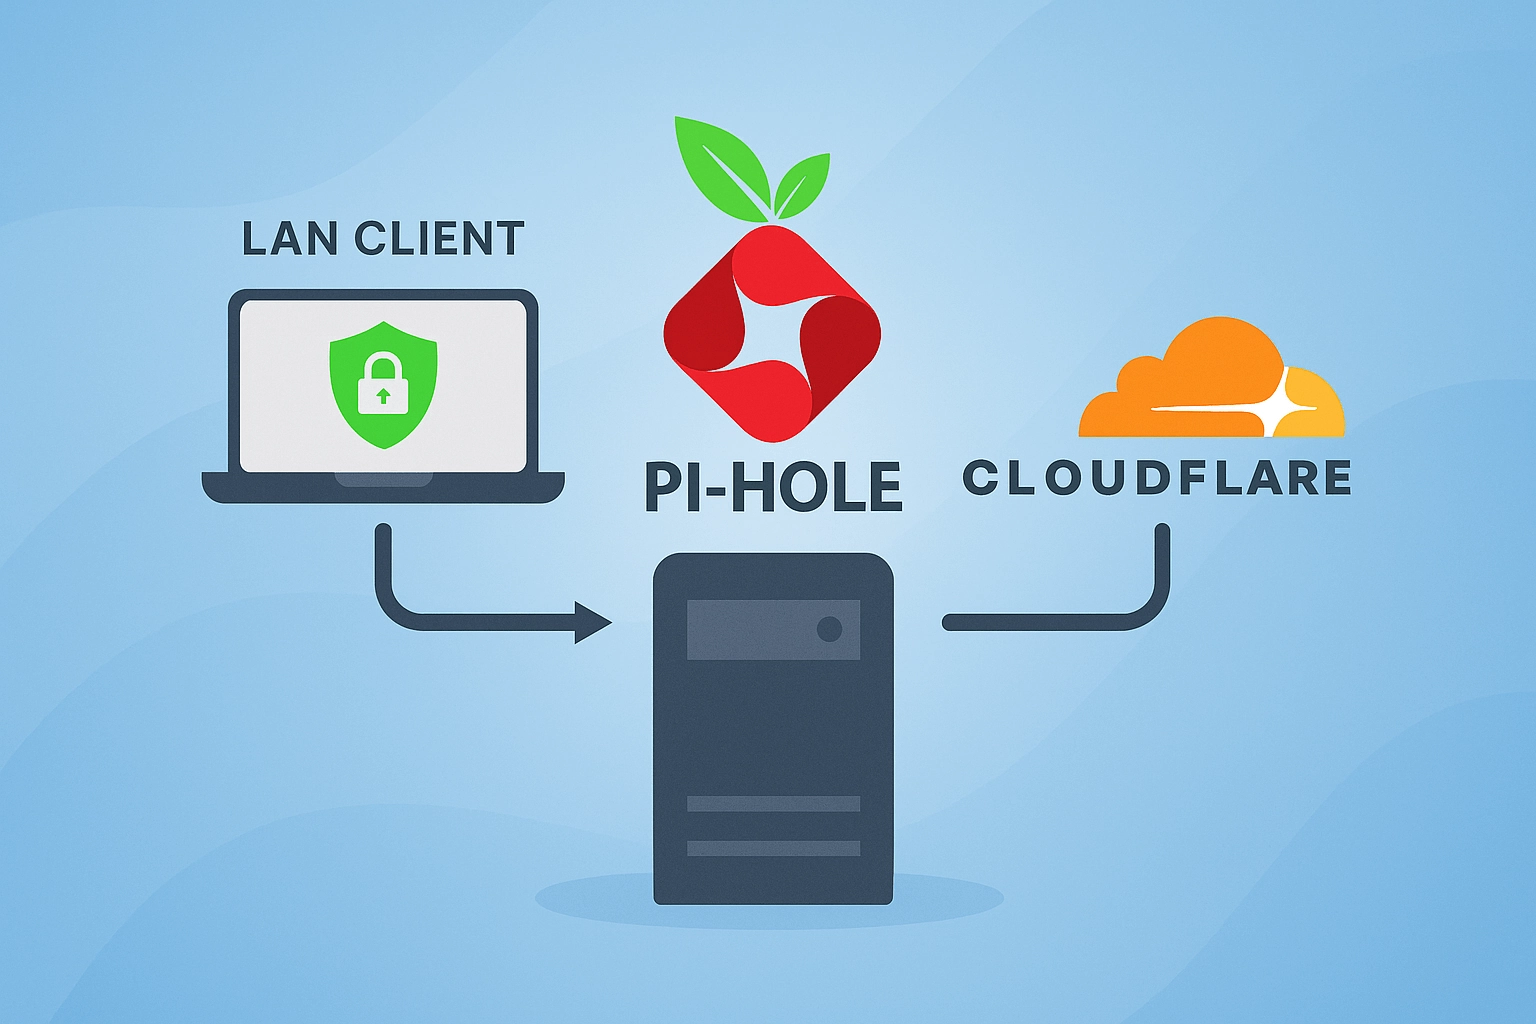
Our router will use Pi-hole as its primary DNS server. LAN devices obtain their IP configuration via DHCP from the router, which includes the DNS server address. By specifying Pi-hole as the DNS server in the router’s settings, all connected devices will automatically send their DNS queries to Pi-hole without requiring manual configuration. Pi-hole then forwards those queries to Cloudflared, which encrypts them using DoH. This setup hides requested hostnames from your ISP while giving you full control over DNS filtering.
Later, I plan to extend the setup to run on a dual-NIC server, allowing it to act as the network gateway. In that setup, all outbound internet traffic will be routed through Cloudflare WARP or a traditional VPN, fully encrypting it so that the ISP only sees a single encrypted tunnel.
Podman
Podman is an open-source container engine developed by Red Hat that runs containers and pods without a central daemon. It’s a safer and more modern alternative to Docker, supporting rootless operation, systemd integration, and Docker-compatible images and CLI. Podman is the default container engine on Fedora and RHEL, but it runs on any major Linux distribution, making it a great fit for lightweight, secure setups like this one.
Cloudflared
Cloudflared is a lightweight command-line proxy developed by Cloudflare. It securely forwards DNS queries from your local network to Cloudflare’s DNS-over-HTTPS (DoH) servers. This ensures that DNS requests are encrypted in transit, preventing your ISP or other intermediaries from seeing which domains are being resolved. Cloudflared is free, fast, minimal, and ideal for use as an upstream resolver in local DNS setups like Pi-hole.
Pi-hole
Pi-hole is a local DNS server that acts as a filtering layer, blocking advertising, tracking, and malicious domains. It works by combining DNS functionality with a hosts-based blocklist model. Out of the box, it includes a large list of known tracking domains (~190k entries), and you can expand to the list by adding your own blocklists. Simply supply Pi-hole with URLs to plaintext hosts files, and it will merge them.
I have curated my own blocklist for domains known to serve ads, tracking scripts, and behavioral analytics – with a focus on those active in the Nordic countries (Denmark, Sweden, Norway, Finland, and Iceland), but not limited to these. It is not intended to be a complete blocklist, but rather a targeted extension to improve privacy for users in the Nordics.
The blocklist and how to use it is described in this project on Github:
Architecture Overview
For the sake of this guide, I will call our servers hostname: myserver, and assume it’s configured with the static IP 192.168.0.100.
- myserver runs Fedora Server with Podman, managing two containers:
cloudflaredfor DoH (upstream to Cloudflare’s1.1.1.1)piholeas the authoritative DNS for the LAN
- The router uses Pi-hole as its primary DNS resolver
- Cloudflare (1.1.1.1) is kept as a fallback in case myserver goes down
- NGINX proxies Pi-hole’s web-interface
http://localhost:4000tohttps://myserver.lan/adminusing a local TLS certificate
1. Deploy Podman Pod with Cloudflared and Pi-hole
1.1 Install Required Tools
First install podman, and policycoreutils-python-utils (if you are on Fedora/RHEL).
podman uses policycoreutils-python-utils for managing SELinux policies, such as labeling volumes and containers securely.
sudo dnf install podman policycoreutils-python-utils1.2 Create Volumes for Persistent Storage
Create persistent storage for Pi-hole, so that its SQLite database and configuration files survive container re-deployments.
sudo mkdir -p /var/lib/podman/pihole-data
sudo mkdir -p /var/lib/podman/dnsmasq-data
sudo chown root:root /var/lib/podman/pihole-data /var/lib/podman/dnsmasq-data
sudo chmod 755 /var/lib/podman/pihole-data /var/lib/podman/dnsmasq-data
1.3 Create Pod
We will create a pod named dnsstack to group our containers and expose the necessary ports for DNS, DHCP (optional), and the Pi-hole web interface. This ensures all services run under a shared network stack and are accessible on the local IP 192.168.0.100.
sudo podman pod create --name dnsstack \
  -p 192.168.0.100:53:53/tcp \
  -p 192.168.0.100:53:53/udp \
  -p 192.168.0.100:67:67/udp \
  -p 192.168.0.100:4000:4000/tcp \
Port 67 is only needed if Pi-hole will act as DHCP server. In our setup we will use our router as DHCP server, but you can leave the port open, if you ever plan to use Pi-hole instead.
1.4 Create Containers
Cloudflared (DNS-over-HTTPS)
Now we create the Cloudflared container inside the dnsstack pod. It listens on port 5053 and securely forwards DNS queries to Cloudflare’s DoH servers at 1.1.1.1 and 1.0.0.1.
sudo podman create --name cloudflared --pod dnsstack \
  docker.io/cloudflare/cloudflared:latest \
  proxy-dns --port 5053 --address 0.0.0.0 \
  --upstream https://1.1.1.1/dns-query \
  --upstream https://1.0.0.1/dns-query
Pi-hole (Local DNS + DHCP)
Create the Pi-hole container in the dnsstack pod, configured to use Cloudflared as its upstream DNS (127.0.0.1#5053). It exposes the admin interface on port 4000, enables reverse DNS for the local network, and mounts persistent volumes for configuration and DNS data.
Change mypassword to your desired password for Pi-hole web-interface.
sudo podman create --name pihole --pod dnsstack \
  -e TZ="Europe/Copenhagen" \
  -e FTLCONF_webserver_api_password="mypassword" \
  -e FTLCONF_dns_upstreams="127.0.0.1#5053" \
  -e FTLCONF_webserver_port="4000o" \
  -e REV_SERVER="true" \
  -e REV_SERVER_CIDR="192.168.0.0/24" \
  -e REV_SERVER_TARGET="192.168.0.1" \
  -e REV_SERVER_DOMAIN="home" \
  -v pihole-data:/etc/pihole \
  -v dnsmasq-data:/etc/dnsmasq.d \
  docker.io/pihole/pihole:latest
1.5 Generate and Enable Systemd Unit
Generate a systemd unit for the dnsstack pod to ensure it starts automatically on boot and restarts if it crashes. The generated service is placed in /etc/systemd/system, then enabled and started using systemctl.
cd /etc/systemd/system
sudo podman generate systemd --name dnsstack --files --restart-policy=always --new
sudo systemctl daemon-reexec
sudo systemctl daemon-reload
sudo systemctl enable --now pod-dnsstack.service
2. Configure Pi-hole Internals
Now that Pi-hole is running, we’ll configure its DNS settings to bind to the correct interface, define a LAN domain, and optionally add local DNS records. This ensures correct name resolution and domain mapping within your local network.
Visit: http://192.168.0.100:4000/admin/
2.1 DNS Settings
Configure Pi-hole to bind only to the interface inside the pod and define the internal LAN domain name.
- Interface binding: Settings > DNS > Interface settings > choose Bind only to interface
- Local domain: Settings > DNS > DNS domain settings > set to: lan
2.2 Local DNS Records
Add static DNS records for your server and optionally for other local devices.
- Local DNS > Local DNS Records > Add the following:
- Domain:
myserver.lan - IP:
192.168.0.100
These are Pi-hole DNS records, just like A-records in any DNS server. You can map .lan devices (e.g. printer.lan, nas.lan) to static IPs.
2.3 Privacy Mode
Enable anonymous query logging to minimize tracking and exposure of client information.
- Privacy > Query Anonymization > choose: Anonymous mode
3. Configure the server to Use DoH (via Pi-hole)
Once Pi-hole is up and working, we want our server itself to use Pi-hole as its primary DNS resolver. This phase replaces the system’s default DNS resolver with one that uses our secure setup.
3.1 Point the Server’s DNS to Pi-hole
We replace the system’s default DNS configuration with a static resolv.conf, making Pi-hole (127.0.0.1) the primary resolver and Cloudflare the fallback. This ensures all DNS queries from the server itself go through your local DoH setup.
sudo cp /etc/resolv.conf /etc/resolv.conf.backup
sudo rm -f /etc/resolv.conf
echo -e "nameserver 127.0.0.1
nameserver 1.1.1.1
nameserver 1.0.0.1" | sudo tee /etc/resolv.conf
3.2 Disable systemd-resolved
Disable the system’s default DNS resolver to prevent it from overwriting or interfering with our custom /etc/resolv.conf settings.
sudo systemctl disable --now systemd-resolvedTest the configuration by running ping google.com or dig google.com to confirm DNS resolution is working through Pi-hole and Cloudflared.
4. Switch to Network Bridge (br0)
To make the server consistently reachable from the LAN, we’ll replace libvirt’s default NAT network with a bridged interface (br0) and assign it a static IP. This ensures DNS traffic sent to the server is properly routed to the Pi-hole container running inside the dnsstack pod.
4.1 Disable libvirt NAT
Disable libvirt’s default virtual network and prevent it from starting automatically on boot. This avoids interference with our new br0 bridge setup, while keeping the network definition intact in case we want to re-enable it later.
sudo virsh net-autostart default --disable
sudo virsh net-destroy default
4.2 Create Persistent Bridge
Create a new persistent bridge interface (br0) and attach your physical Ethernet interface (ens9) as a slave. This allows the system to route all network traffic through the bridge, making it accessible to the LAN.
sudo nmcli connection add type bridge ifname br0 con-name br0 autoconnect yes
sudo nmcli connection add type ethernet ifname ens9 master br0 con-name br0-slave autoconnect yes
4.3 Prevent Interface Conflict
Disable automatic activation of the physical interface (ens9) to avoid conflicts. This ensures the interface is only brought up as a slave to the br0 bridge and never used independently.
sudo nmcli connection modify ens9 connection.autoconnect no
sudo nmcli connection down ens9
4.4 Assign Static IP + DNS
Configure the br0 bridge with a static IP address, default gateway, and DNS settings. This ensures the server is always reachable at the same LAN IP and uses Pi-hole (with fallback to Cloudflare) for DNS resolution.
Note that the gateway is set to 192.168.0.1. Adjust this if your router uses a different IP address.
sudo nmcli connection modify br0 ipv4.addresses 192.168.0.100/24
sudo nmcli connection modify br0 ipv4.gateway 192.168.0.1
sudo nmcli connection modify br0 ipv4.dns "192.168.0.100 1.1.1.1 1.0.0.1"
sudo nmcli connection modify br0 ipv4.method manual
4.5 Bring Up the Bridge
Activate the new bridged network configuration:
sudo nmcli connection up br0Phase 5: Setup NGINX TLS Proxy (HTTPS for Pi-hole)
Pi-hole’s built-in lighttpd server currently only supports TLS 1.2 and fails to serve modern self-signed certificates correctly, resulting in browsers rejecting the connection entirely. To fix this, we’ll configure an NGINX reverse proxy with a proper TLS 1.3-capable setup, making the Pi-hole interface securely accessible at https://pi.myserver.lan/admin.
5.1 Generate a Self-Signed TLS Certificate
Create a self-signed TLS certificate for your local server, covering the main domain (myserver.lan), any hosted domains, and their subdomains. This will allow NGINX to securely serve the Pi-hole interface over HTTPS with TLS 1.3.
# Create a directory for your local TLS certificate
sudo mkdir -p /etc/ssl/myserver
cd /etc/ssl/myserver

# Create an OpenSSL config for generating a wildcard certificate
sudo tee myserver.cnf > /dev/null <<EOF
[req]
distinguished_name = req_distinguished_name
x509_extensions = v3_req
prompt = no

[req_distinguished_name]
CN = myserver.lan

[v3_req]
keyUsage = digitalSignature, keyEncipherment
extendedKeyUsage = serverAuth
subjectAltName = @alt_names

[alt_names]
DNS.1 = myserver.lan
DNS.2 = *.myserver.lan
IP.1 = 192.168.0.100
EOF

# Generate a self-signed certificate and private key
sudo openssl req -x509 -nodes -newkey rsa:2048 \
  -keyout server.key \
  -out server.crt \
  -days 825 \
  -sha256 \
  -config myserver.cnf \
  -extensions v3_req
5.2 Install NGINX
Install NGINX and set up the necessary environment for serving HTTPS traffic, including directory structure, user permissions, SELinux context (if applicable), and firewall rules.
Again, if you’re not running Fedora/RHEL, leave out the SELinux part.
# Install NGINX
sudo dnf install nginx -y

# Create a dedicated group and assign it to NGINX and your user
sudo groupadd www-data
sudo usermod -aG www-data nginx
sudo usermod -aG www-data $USER

# Set up web root and log directories for the Pi-hole proxy
sudo mkdir -p /var/www/pi.myserver.lan/{wwwroot,logs}
sudo chown root:www-data /var/www
sudo chmod 2775 /var/www

# Configure SELinux context and allow NGINX outbound network access
sudo semanage fcontext -a -t httpd_log_t "/var/www(/.*)?/logs(/.*)?"
sudo restorecon -Rv /var/www
sudo setsebool -P httpd_can_network_connect 1

# Open HTTPS port in the firewall
sudo firewall-cmd --add-service=https --permanent
sudo firewall-cmd --reload
5.3 Configure NGINX Virtual Host for Pi-hole
Create an NGINX server block that redirects all HTTP traffic to HTTPS and securely proxies the Pi-hole web interface over TLS.
sudo tee /etc/nginx/conf.d/pi.myserver.lan.conf > /dev/null <<'EOF'
# Redirect HTTP to HTTPS
server {
    listen 80;
    server_name pi.myserver.lan;
    return 301 https://$host$request_uri;
}

# Serve HTTPS with reverse proxy to Pi-hole
server {
    listen 443 ssl;
    server_name pi.myserver.lan;

    ssl_certificate     /etc/ssl/myserver/server.crt;
    ssl_certificate_key /etc/ssl/myserver/server.key;
    ssl_protocols       TLSv1.2 TLSv1.3;
    ssl_ciphers         HIGH:!aNULL:!MD5;

    root /var/www/pi.myserver.lan/wwwroot;
    access_log /var/www/pi.myserver.lan/logs/access.log;
    error_log  /var/www/pi.myserver.lan/logs/error.log;

    location / {
        proxy_pass http://192.168.0.100:4000/;
        proxy_set_header Host \$host;
        proxy_set_header X-Real-IP \$remote_addr;
    }
}
EOF
5.4 Start and Verify NGINX
Enable and start the NGINX service, then test the configuration to ensure it’s valid and reload it if needed. Once running, you can access the secure Pi-hole interface over HTTPS.
sudo systemctl enable --now nginx
sudo nginx -t
sudo systemctl reload nginx
You can now access the Pi-hole web interface at:
https://pi.myserver.lan/admin/
Fallback (direct port access):
http://192.168.0.100:4000/admin/
Redeploying Pi-hole
To upgrade or modify your Pi-hole container (e.g., update to the latest image), stop and remove the existing container, then recreate it with the same parameters. Your settings will persist thanks to the mounted volumes.
1. Stop and Remove Existing Container
sudo podman stop pihole
sudo podman rm pihole
2. Pull Latest Image
sudo podman pull docker.io/pihole/pihole:latest3. Recreate the container
Change mypassword to your desired password for Pi-hole web-interface.
sudo podman create --name pihole --pod dnsstack \
  -e TZ="Europe/Copenhagen" \
  -e FTLCONF_webserver_api_password="mypassword" \
  -e FTLCONF_dns_upstreams="127.0.0.1#5053" \
  -e FTLCONF_webserver_port="4000o" \
  -e REV_SERVER="true" \
  -e REV_SERVER_CIDR="192.168.0.0/24" \
  -e REV_SERVER_TARGET="192.168.0.1" \
  -e REV_SERVER_DOMAIN="lan" \
  -v pihole-data:/etc/pihole \
  -v dnsmasq-data:/etc/dnsmasq.d \
  docker.io/pihole/pihole:latest
3. Restart the Pod
Restart the dnsstack pod to apply changes and bring Pi-hole back online:
sudo systemctl restart pod-dnsstack.serviceYour Pi-hole configuration and DNS history remain intact thanks to the persistent named volumes.
Conclusion
With this setup, you’ve implemented secure DNS with Cloudflared and Pi-hole across your entire LAN. DNS queries are encrypted via DNS-over-HTTPS, filtered locally through Pi-hole, and served over a modern HTTPS interface using NGINX with TLS 1.3. The architecture is modular, and easy to maintain or upgrade thanks to Podman and the use of persistent volumes for storing configuration and data. Whether your goal is enhanced privacy, ad blocking, or hands-on infrastructure experience, this guide provides a reliable and extensible foundation for local DNS control.