Introduction
Local LLMs make it possible to run large language models entirely on your own Linux system, without sending prompts or data to third-party cloud services. All processing stays local, respecting your privacy.
This How to run Local LLMs on Linux with Ollama and Open WebUI guide shows how to install Ollama as a local model runtime, deploy Open WebUI as a chat interface using Podman and Quadlet, and connect everything into a working local AI stack. We will also install a real LLM and verify that both CLI and web-based usage work.
While the terminology around LLMs, runtimes, and frontends can sound complex, the actual setup is straightforward. It is also a great hands-on way to learn how modern AI systems are structured, from model execution to APIs and client applications.
By the end of this guide, you will have a reproducible Linux-based setup where models run locally, Open WebUI provides a ChatGPT-like interface, and tools can connect to Ollama through its API.
Local LLM Architecture Overview
Model
LLMs (Large Language Models)
Large Language Models are neural networks trained on large text corpora to predict the next token in a sequence. This simple mechanism enables emergent capabilities such as reasoning, summarization, code generation, translation, and structured output.
Runtime + API
Ollama
Ollama is the local model runtime and management layer.
It downloads, stores, loads, and executes LLMs on your machine and exposes them through a local HTTP API. This makes models accessible both from the command line and from external applications.
Conceptually, Ollama plays a role similar to Docker or Podman, but for language models instead of containers.
Client
Open WebUI
Open WebUI is a web-based user interface for interacting with LLMs.
It connects to the Ollama API and provides a chat-style interface similar to ChatGPT, including conversation history, model selection, and basic configuration.
Open WebUI does not run models itself. It is purely a frontend that talks to Ollama.
Claude Code, Codex, OpenClaw
These tools act as AI-powered assistants for coding and sysadmin workflows.
They connect to an LLM backend (in this setup: Ollama) and use it as a reasoning engine to:
- Generate and modify code
- Explain errors and logs
- Assist with shell commands and automation
- Perform refactoring and documentation tasks
They are clients of the Ollama API, not model runtimes.
Mental Model
LLM > The model that does the reasoning
Ollama > Runs the model and exposes an API
Open WebUI > Chat frontend
Claude Code / Codex / OpenClaw > Specialized clients for development and operations
This separation is important: you can change models without changing tools, and change tools without changing models.
Flow Diagram
┌───────────────────┐
│        LLMs       │
│ (Models on disk)  │
└─────────▲─────────┘
          │
          ▼
┌─────────┴─────────┐
│      Ollama       │
│  Runtime & API    │
└─────────▲─────────┘
          │
┌─────────▼─────────────────────┐
│      Clients / Interfaces     │
│  Open WebUI                   │
│  Claude Code, Codex, OpenClaw │
└───────────────────────────────┘
Install Ollama
Ollama is available in dnf and apt, but those packages often lag behind upstream.
Since LLM runtimes evolve quickly, it is recommended to install the latest version directly from upstream.
Run the installer:
curl -fsSL https://ollama.com/install.sh | shThis installs the Ollama binary and the systemd service.
Because Ollama is installed outside your system package manager, updates will not be handled by dnf or apt. To update Ollama in the future, simply run the same install script again.
Verify installation:
ollama --versionChange Model Storage Location
Models are large and accumulate quickly.
By default, Ollama stores models under its system data directory: /usr/share/ollama/.ollama/models/
If you have a dedicated storage volume, you can change this location. This is optional but recommended.
Create a systemd override:
sudo systemctl edit ollama.serviceAdd:
[Service]
Environment="OLLAMA_MODELS=/workloads/ollama/models"
Replace /workloads/ollama/models with the path where you want Ollama to store downloaded models.
Save and exit.
If you already downloaded models, move them manually:
sudo mv /usr/share/ollama/.ollama/models/* /workloads/ollama/models/Reload and Enable Ollama
After modifying the service:
sudo systemctl daemon-reload
sudo systemctl enable ollama
sudo systemctl start ollama
Verify that it is running:
sudo systemctl status ollamaInstall Open WebUI
We will install Open WebUI inside a rootless Podman container managed by Quadlet (systemd-native container units).
If you prefer other deployment methods (Docker, Kubernetes, etc.), see the official quick-start documentation: https://docs.openwebui.com/getting-started/quick-start/
Create Quadlet Directory
Quadlet user units live here:
mkdir -p ~/.config/containers/systemd/Create Open WebUI Container Unit
Create the file:
nano ~/.config/containers/systemd/open-webui.containerWith the following content:
[Unit]
Description=Open WebUI Container
After=network-online.target

[Container]
Image=ghcr.io/open-webui/open-webui:main
ContainerName=open-webui
Network=host
Volume=open-webui:/app/backend/data

[Service]
Restart=always

[Install]
WantedBy=default.targetExplanation:
- Runs Open WebUI as a rootless Podman container managed by systemd
- Uses host networking (
Network=host), meaning the container shares the host’s network namespace - Exposes Open WebUI directly on port 8080 on the host
- Persists application data in a named Podman volume (
open-webui)
Reload systemd and Start Open WebUI
Reload and start:
systemctl --user daemon-reload
systemctl --user start open-webui
Enable automatic startup at login:
systemctl --user enable open-webuiVerify status:
systemctl --user status open-webuiAccess Open WebUI
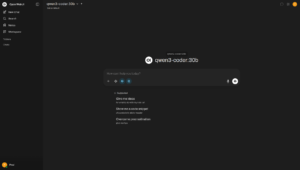
Open your browser, navigate to: http://localhost:8080 and create an admin account.
You should now see the Open WebUI interface.
At this point no models are installed yet, so there is nothing to chat with.
In the next step, we will download and run our first LLM.
Install LLMs
Ollama supports hundreds of LLMs, each with different strengths and hardware requirements.
There is no single “best” model. When running models locally, the main limiting factor is your hardware, especially GPU VRAM.
In my current setup I am running an NVIDIA GeForce RTX 3080 Ti with 12 GB VRAM, which allows me to run models up to around the 30B class.
After testing many models, I have had the best overall results with qwen3-coder:30b from Alibaba.
It is fast and performs well for coding-related tasks.
You can browse all available models at: https://ollama.com/search
Pull Model
In this guide we will install and use qwen3-coder:30b.
Install model:
ollama pull qwen3-coder:30bVerify that the model is installed:
ollama listTest the model from CLI:
ollama run qwen3-coder:30b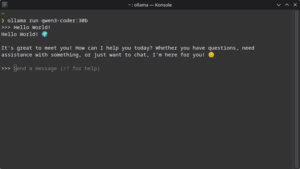
Setting up Open WebUI
Navigate back to: http://localhost:8080
After installing qwen3-coder:30b and refreshing the page, the model should now appear in the model picker in the top-left corner.
Select the model and set it as default.
Arena Models
The description can be confusing at first.
Arena Models is essentially A/B split testing. By default, Arena Models appears as a selectable option in the model picker. Choosing it makes Open WebUI select two random installed models and compare their responses, allowing you to choose the better result.
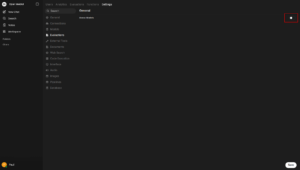
If you do not want this behavior, disable it by going to: Username > Admin Panel > Settings > Evaluations and uncheck “Arena Models” and hit “Save“.
Web Search
By default, models cannot access the web.
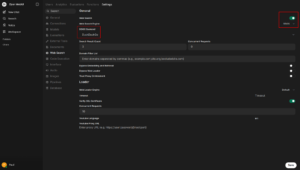
To enable web search go to Username > Admin Panel > Settings > Web Search and check “Web Search“.
Next, select a Web Search Engine.
Most search engines require an API key. You can also run your own search proxy, but in this guide we will use DDGS (DuckDuckGo Search) since it does not require an API key.
Set:
- Web Search Engine: DDGS
- DDGS Backend: DuckDuckGo
Click “Save“.
At this point you should be able to chat with qwen3-coder:30b, and it should be able to perform web searches.
Try asking:
How is the weather today?Memory
Open WebUI only maintains context within each individual chat.
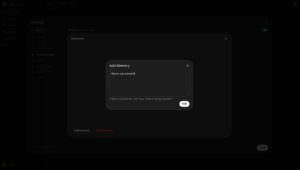
If you want the system to remember persistent information (preferences, instructions, etc.), enable memory by going to: User > Settings > Personalization and check “Memory“.
Click Manage > “Add Memory“, enter the information you want persisted, then click “Add” and “Save“.
Optional Settings
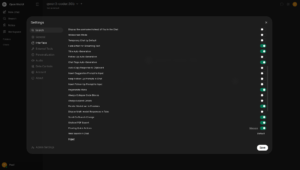
Open WebUI allows extensive customization of the interface by going to: User > Settings > Interface
Examples:
- UI scale
- Disable Follow-Up Auto-Generation
- Disable Insert Suggestion Prompt to Input
- Disable Insert Follow-Up Prompt to Input
Tune these according to preference.
Management
Useful commands for managing the Open WebUI service.
Check status:
systemctl --user status open-webuiView logs:
journalctl --user -u open-webui -fStart service:
systemctl --user start open-webuiStop service:
systemctl --user stop open-webuiRestart service:
systemctl --user restart open-webuiConclusion
You now have a fully functional local LLM environment running on your own hardware. Ollama manages and serves models, Open WebUI provides a chat interface, and models are stored and executed locally without relying on external cloud providers.
This How to run Local LLMs on Linux with Ollama and Open WebUI setup gives you:
- Full control over models and data
- Keeps prompts and responses local, respecting privacy
- No subscription costs
- Reproducible, systemd-managed services
- A foundation for adding developer tools such as Claude Code, Codex, or OpenClaw later
With this base in place, you can experiment with different models, tune performance for your hardware, and expand your local AI stack as your needs grow.
If you wish to go further, you can integrate your local LLM directly into your coding editor (ie. VSCode). This will be covered in a separate guide.